The Kamloops Line

DCC Control and Decoders

Click Passenger car lighting for light & FL4 decoder installs (on Rolling Stock page).
Or try Sound decoders, or Boxcar sound


Site Directory

Home Page

Kamloops Lake

Layout Plan

Scenery

Structures and Details

Locomotives

Rolling Stock

DCC and Controls

Original Layout

Märklin Railroad

Lionel Lines

Site Map

Contact


ctrlmag

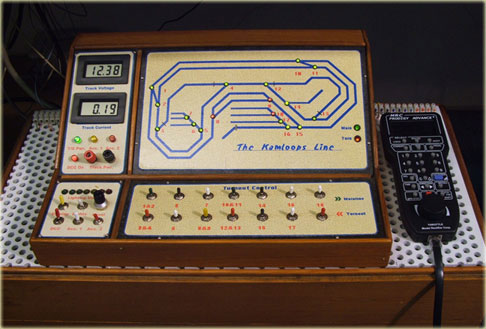
Main Control Center


The DCC control has been upgraded to
MRC Prodigy Advance²
The Prodigy Express operates as #2 cab.

mag Makes a larger picture.

      The first part of controlling my railroad was the operation of the turnouts. My control panel has a track plan (schematic) which includes a bi-color (red/green) LED at the position of each turnout. The LED indicates the position of the turnout, red for divert, green for straight. The control switches are momentary and the LEDs are held on by latching relays.
      The main control panel also switches power for the DCC system, lighting, and monitors track voltage and amperage. Also, there are switches to turn off the yard, mill and roundhouse (see Layout Plan page) track blocks.


coalmag

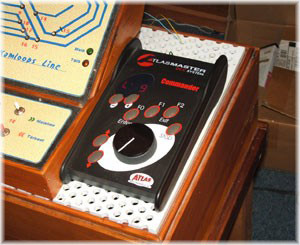
Atlas Commander

DCC control used in original N scale layout.

lksdmag

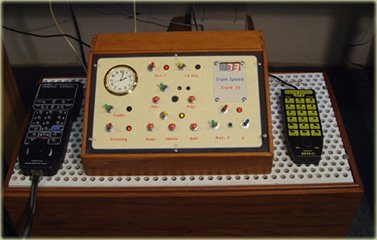
The auxillary control center,

with Prodigy Express DCC control.

      My auxiliary control center does the job of controlling signals, sound effects, crossing lights and the speed monitor, with a few extra aux switches thrown in. Shown above with the Prodigy Express (Cab #2) and the MRC train sound station


contmag

The main control center

with the Prodigy Advance² and the base unit mounted under the table.


      My Atlas Commander has served me well. It is still a good DCC control; I couldn't bring myself to retiring it so I use it at my work table.
      For my expanded railroad I chose MRC Prodigy Express. I like the hand-held control, the full LCD display, the ease of programming and the additional functions selection.
      Now with the Advance² system I have cabs for two operators, a few more programming advantages, more functions, decoder readout, and (with the higher amperage) the auto-reversing loop switches no longer short out the control when a train crosses the insulators.


Decoders

The GP-9 and F40 PH are the first two N scale decoders I installed. They were sort of an experiment, but they worked. Newer
locomotives with drop-ins are much easier. I have almost given up machining the frames unless it is really necessary.


tcsmag

Train Control Systems

TCS M1 decoder in Atlas GP-9

dtxmag

Digitrax

DN 121 decoder in Life-like F40 PH


tcsmag

Kato stock light board

in VIA Rail P42

dtxmag

Model Rectifier Corp (MRC)

MRC #1645 sound decoder


mrcmag

MRC #1806 Sound Decoder

in CN SD40-2 #5934

dtxmag

Digitrax DN163K1B Decoder

in CP SD40-2 #5559


9306dcmag

GP40 loco before decoder

The frames will be disasembled and machined to
make space for the decoder. The rear light is
removed. Areas marked in red will be cut away
to fit the decoder, power wires, motor brush
wires, and headlight wires.

dtx-125mag

Digitrax DZ-125 installed

The frame material is cut away for the decoder. A hole in the side gives access to
the lower motor brush and grooves are cut in the top for the wires to the frame sides and headlight.


9306dcmag

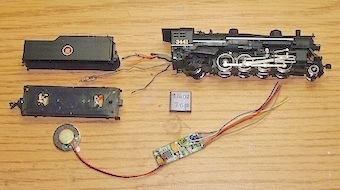
2-8-2 Steam and DCC parts

My 2-8-2 Mikado decided it wanted to have sound like the other locos.
This, the only steam locomotive I have on "The Kamloops Line", is here
to recognize the Kamloops Heritage Railway in Kamloops, BC.
The locomotive is by Model Power and the decoder is MRC 1956.
Also, a 1/4 oz. weight replaces the 1/3 oz. weight in the tender.

dtx-125mag

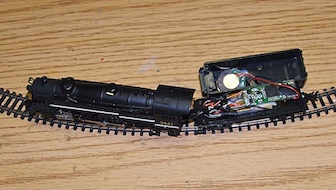
MRC 1956 decoder installed

Both the loco and the tender have power pick-ups so there are three pairs of wires coming from the loco to the tender and the decoder. This picture was taken to show the decoder install in the tender. A better defined image of this loco is on my Locomotives page


9306dcmag

GE U25B parts

The parts for the modification are laid out and ready for work. I have already changed to Rapido couplers to MTL and marked the frame for machining. The loco body here is New York Central and will be repainted to CN.

9306dcmag

GE U25B frame and decoder

Here is the reassembled frame with the TCS M1 decoder installed. I used the rear light board to connect the power wires and the front light board only for the headlight.

u25bmag

NYC is now CN 2525

Just one more CN locomotive for the Kamloops Line. This was an easy change as I only had to remove the NYC, paint the nose and rear red and apply the CN decals. The decals are from Micro Scale Industries.

The Canadian Province and Territory Series by Micro Trains Line


ftbmag

FTA loco with DZ125 decoder installed

These are about the easiest locos in which to install hard wired decoders. On the A Unit only, the diode and cacacitor need to be removed. Then the traces are cut (notched) to isolate the light and motor connections.See next picture enlargement.

ftbmag

FTB loco before decoder

Here you can see the recess in the frames which is provided for a decoder installation. The recess will be covered with insulating tape wrapped about 3/16" down the sides. This will keep the motor brush strips from contacting the frames.

dtx-125mag

FTB Unit with DZ-125 installed

There are no lights on the B Unit so the blue, yellow and white wires are not used. The red and black wires connect to the frames, the gray and orange wires connect to the motor. Note the front and rear of the shell so it will go back on correctly.


Boxcar Sound

ftbbox1

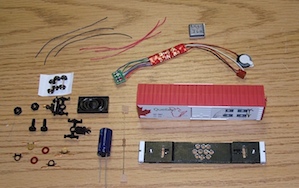
Parts for the Boxcar Sound

Having installed DZ125 decoders in the FTA&B units of my MTL Canadian Provinces Series locomotives, I now have a very special train, but without sound. I did not want to machine the frames of the FTA or B unit to make a sound decoder fit. It would mean taking a lot of metal material away and reducing the weight. The solution for sound came from Streamlined Backshop Services www.sbs4dcc.com in the form of their Boxcar Sound kit. The parts in the kit are shown here. The kit does not include the Digitrax DSN144 decoder or the boxcar.
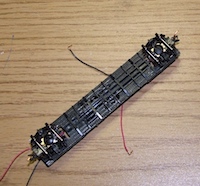
      This picture shows the boxcar frame where I have drilled the holes for the speaker and cut the slots for the power wires.

ftbmag

Boxcar frame underside

Shown here is the underside of the MTL boxcar frame with the trucks reinstalled. The brass power contact can be seen where they attach under the truck mounting pivot screw and ride against the inside flange of the wheels. The red and black power wires are soldered to tabs on the inboard side of the contact strips. A kapton washer is placed between the contacts to insulate the left and right power sides. This was the most tedious part of this project.

ftbmag

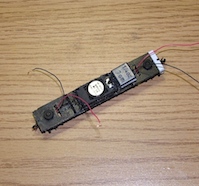
Boxcar frame topside

The topside of the boxcar frame is where the speaker is attached. I used a silicone adhesive and allowed it to cure overnight. The power wires extend through the slots in the frame and the jam-nuts for the pivot screws are at the ends. I have placed one 1/4 oz weight on the frame near the speaker. Because of its cast aluminum frame the MTL Boxcar weighed in at 1.02 oz before modification. With the one weight, it now weighs 1.27 oz.

dtx-125box-snd

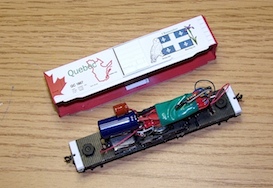
DSN144PS sound decoder Installed

Here is the completed project. In this picture I have installed the 1000uF capacitor and also left the factory installed capacitor in the circuit. The 100 Ohm resistor is up and in the air. I left it in the open as it was getting quite warm. After programming it was barely warm. The rest of the wires and the unused decoder wires are bundled under the decoder. With the boxcar shell replaced and the car on a test track I changed the address and the sound scheme for diesel. The sound effects for this decoder are quite good and the speaker output has plenty of volume. I will use this sound boxcar in consist with my MTL Canadian Province Series FTA&B locomotives.

Click Canadian Province and Territory Series for a picture of the complete train.


Top

Home Page - Kamloops Lake - Layout Plan - Scenery - Structures and Details - Locomotives - Rolling Stock - DCC and Control - Original Layout - Märklin Railroad (1960s) - Links

E-mail wolfden@terragon.com